Setting up with MagicDraw 18.4 for use with STEPlib

Todo
Options->Environment->General->Save/Load->Save UUID
Introduction
This page explains how to set up MagicDraw for use when developing STEP standards using STEPlib.
Note
Before work can start (particually for new projects) it may be necessary for the Team Leader to complete some tasks.
Software version
MagicDraw version 18.4 SP1 (with MERGE plugin) is used for STEPlib and this documentation
Prerequists
This assumes that the STEPlib Git repository has already been cloned as described in Git Developer Documentation.
Configuration
The steps are:
Environment
Path variables
A path variable (Options->Environment->Path Variables) STEPlib needs to be added and set to the path to the STEPlib folder in the cloned Git project.
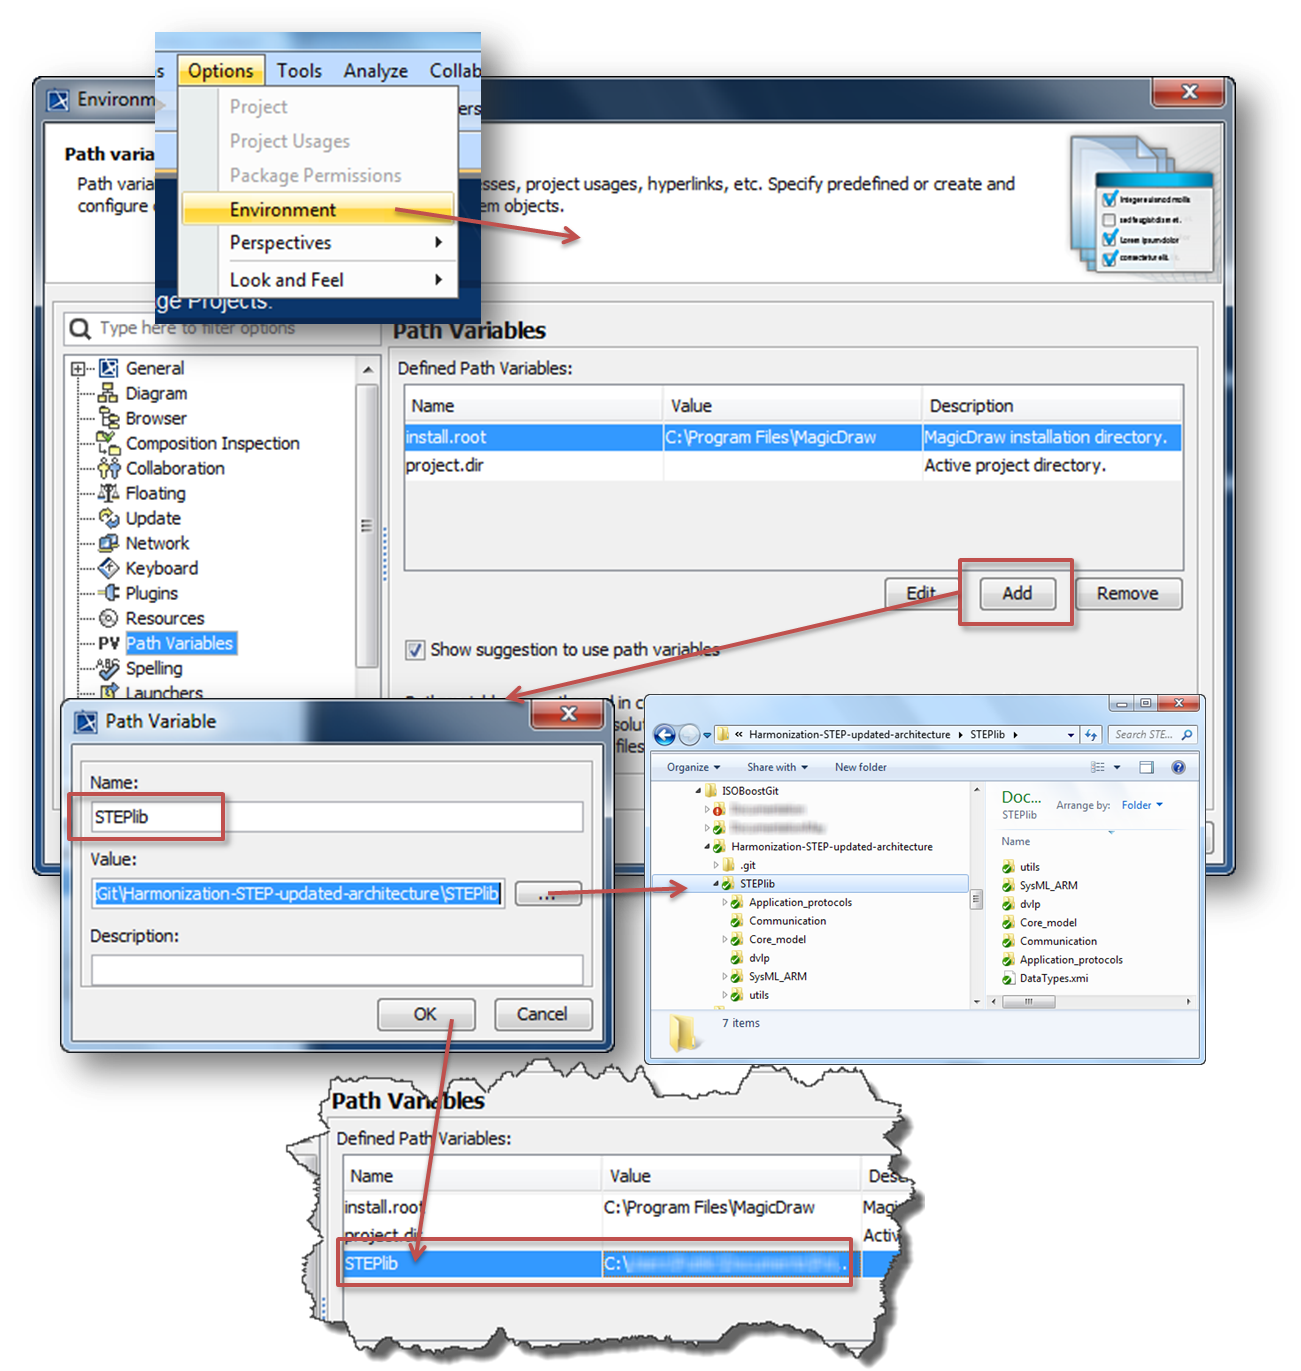
Figure 13 Setting the STEPlib path environment variable
To ensure relative paths from this start point are captured correctly this should be used whenever exporting from MagicDraw (e.g. when separating out a CTC into a separate file). This will enable the model to be transferred to other developer’s machines.
Save with UUID
The environment needs to be set to save with UUID (Options->Environment->General->Save/Load->Save UUID).
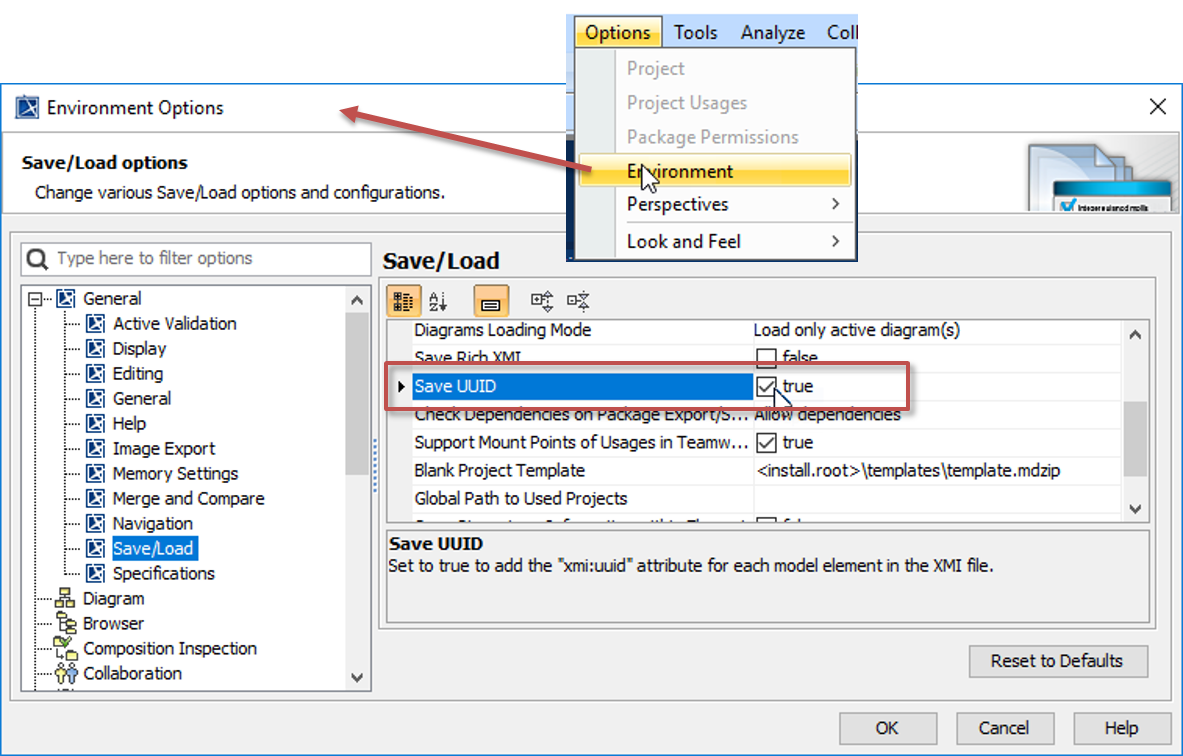
Figure 14 Setting Save with UUID
Dictionary English-GB
ISO standards use the GB English dictionary (officially The Concise Oxford Dictionary of Current English). The default for MagicDraw is US English which should be changed.
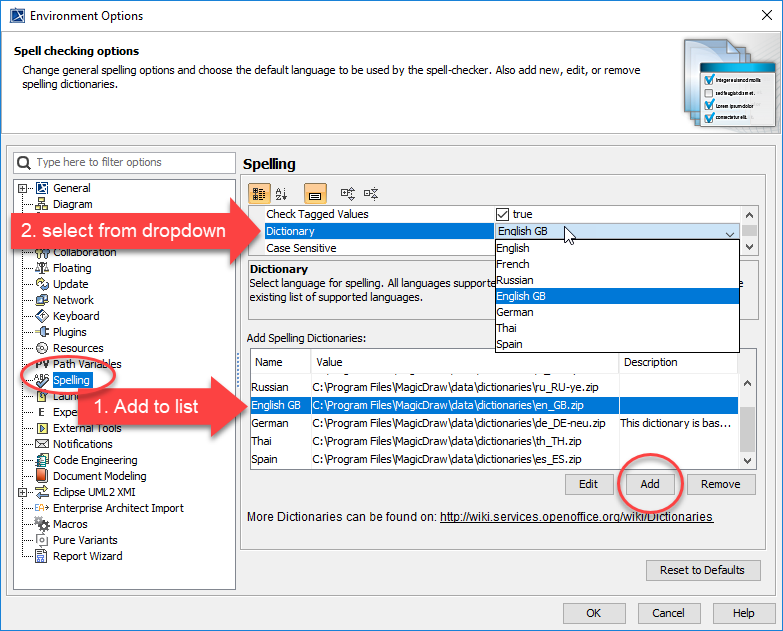
Figure 15 Setting Dictionary to GB English
- Select Options > Environment
- Select the “Spelling”
- Check that English GB is in the list of options (lower panel). If it is not, a copy should be in the same installation folder as the other dictionries and can simply be added. If not, then a copy should be obtained from the internet
- In the Spelling panel, change the Dictionary option to use this English GB dictionary
Increase Memory Allocation
If you receive an error message saying your modeling tool is out of memory, the application does not have enough memory to operate. You can change the amount of allocated memory directly in the error message dialog or by changing modeling tool properties.
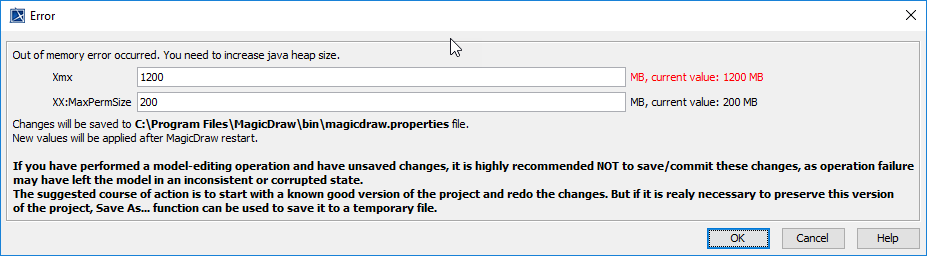
Figure 16 Memory Error message
If you computer has enough memory (see below) the recommended value for Xmx is 4000. Default is 1200.
Warning
You will need admin rights to change these settings
The following is an extract from the MagicDraw documentation.
Note
Hint
Memory allocation concept
Memory allocation for the product is the same as Java heap size. To increase the amount of memory allocated for the product, simply increase the Java heap size.
Recommended amount of allocated memory
The amount of allocated memory (or Java heap size) should be set to less than the available physical RAM on your computer. To calculate the approximate amount of memory you should allocate, subtract the amount of memory taken by any other processes that will run concurrently with your modeling tool from the total amount of RAM in your computer. Otherwise your JVM process will likely swap, and that will slow down the application.
Warning
Do not allocate too much memory
If you increase the Java heap size too much, you will get an error message that the Java virtual machine cannot be created, and a modeling tool will not start.
The maximum theoretical heap limit for the 32-bit JVM is 4G. In practice, the limit can be much lower, due to various additional constraints such as available swap, kernel address space usage, memory fragmentation, and VM overhead.
- On most 32-bit Windows systems the maximum heap size ranges from 1.4G to 1.6G.
- On 32-bit Solaris kernels the address space is limited to 2G.
- On 64-bit operating systems running the 32-bit VM, the max heap size can be higher, approaching 4G on many Solaris systems.
- On 64-bit VMs, the maximum Java heap size is limited only by the amount of physical memory and swap space your system provides.
Changing the amount of allocated memory
You can set the amount of memory allocated for your modeling tool either in the Environment Options dialog or in the modeling tool properties file.
To change the amount of allocated memory in the Environment Options dialog
- In the main menu of your modeling tool, go to Options > Environment. The Environment Options dialog opens.
- Expand the General options group on the left side of the dialog, and select the Memory Settings category.
- In the option specification area on the right side of the dialog, change the value of the Maximum Heap Size or Thread Stack Size option.
To change the amount of allocated memory in the modeling tool properties file
- Go to <modeling tool installation directory>bin and open the modeling tool properties file.
- In the JAVA_ARGS line, change the value of the -Xmx or -Xss property. For example, change the -Xmx800M to -Xmx1066M.
- Save and close the file.
- Restart your modeling tool.
Set System Engineer Perspective
The SysML tools are accessed when using the “System Engineer” perspective which is not the default so needs to be set using Options > Perspectives > Perspectives.
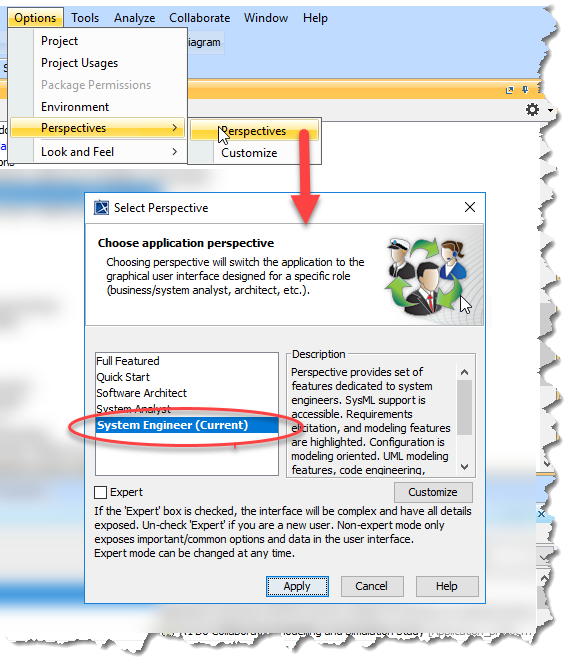
Figure 17 Change Perspective to “System Engineer”
Load Macros
Some macros have been developed to aid developement. These are stored in the STEPlibutilsMagicDraw folder.
- Open Tools > Macros > Organize Macros
- Select Add
- Enter a name (e.g. Get UUID)
- Select the macro language (e.g. JavaScript)
- Browse to select the file (e.g. STEPlib\utils\MagicDraw\getUUIDmacro.js)
- add an arguments needed by the macro (e.g. none)
- optionally add an unused short cut (e.g. ctrl-alt-shift u)
More details can be found in the MagicDraw online help - Macros.
Opening the model
The steps are:
Before opening the model, the STEPlib environment variables and Perspective must be set.
Open the top level model
The top level model is STEPlib.mdzip and is stored in the STEPlib/dvlp folder.
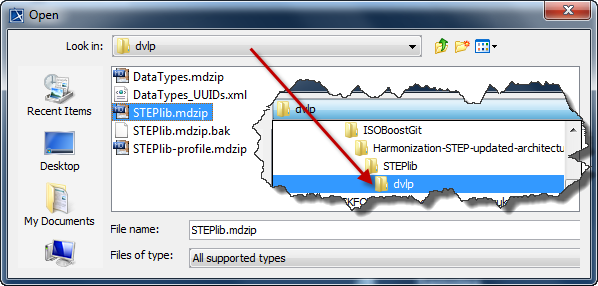
Figure 18 Open STEPlib.mdzip in MagicDraw
Several “Loading...” windows open, and then the model as shown below.
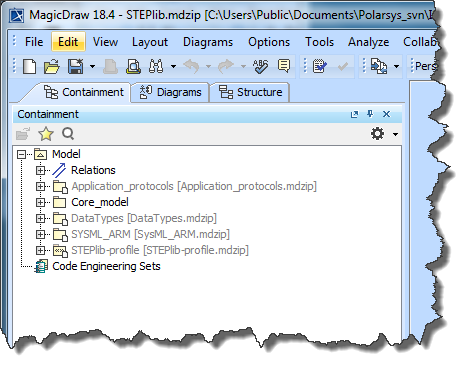
Figure 19 STEPlib.mdzip opened in MagicDraw
Open readonly sub models
The SysML model in STEPlib is split between several connected “projects” in separate files. In MagicDraw each project needs to be open to be editable. The default behaviour is to open the projects in readonly, so on first opening most of the content is readonly (greyed out) as shown in :numref`gs_md_fig_openedModel`.
A sub-project is opened using the “Project Usages” dialog which is available from the tree on the M-R menu for single projects (see Figure 20). Alternatively the settings for multiple projects can be controlled from the “Options > Project Usages” (see Figure 21). These are illustrated below. For more details see MagicDraw online help - Managing used Projects.
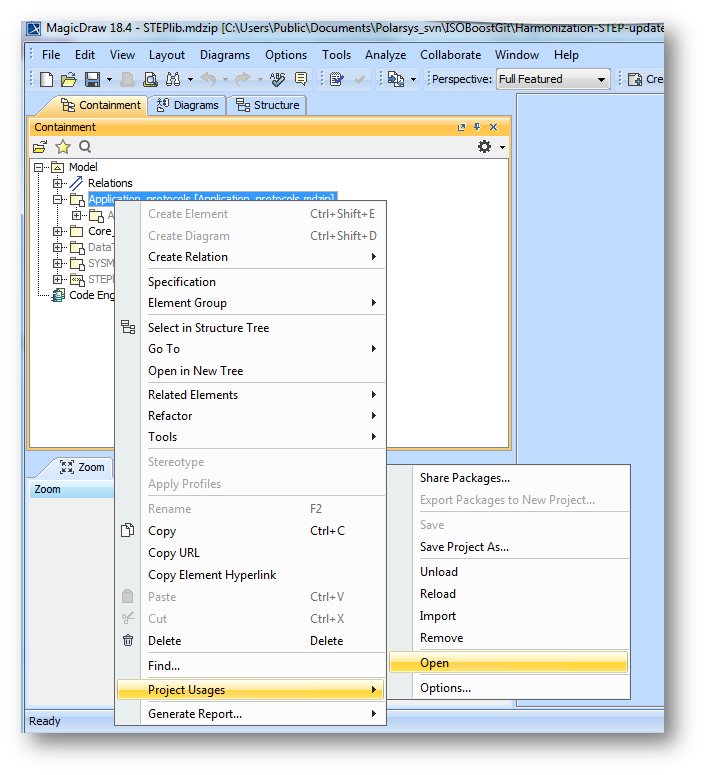
Figure 20 Opening a project from the tree
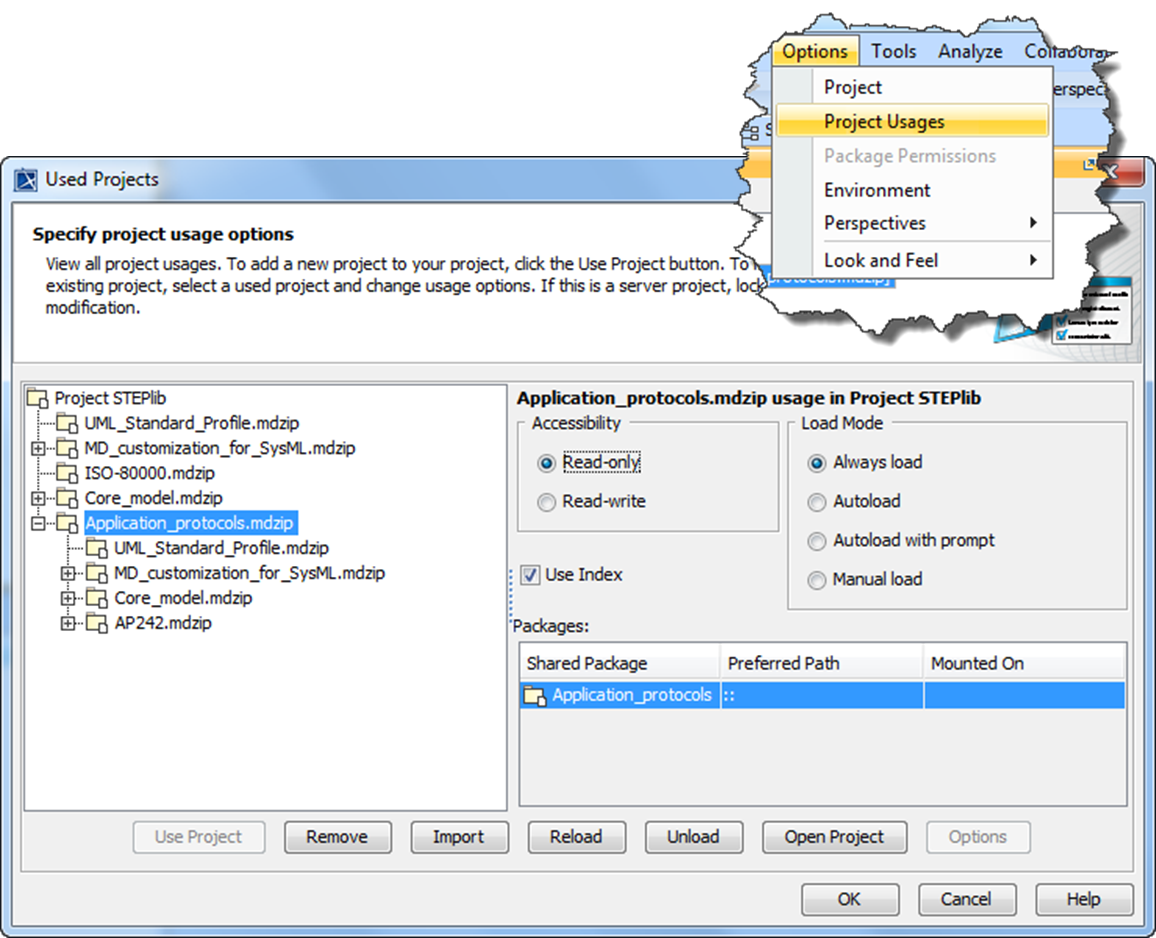
Figure 21 Options dialog for Opening multiple projects
Saving the model
Todo
all of this section
Commiting the changes
This is covered in the Git Developer Documentation.
Todo
all of this section
Section author: Judith Crockford (AP243)